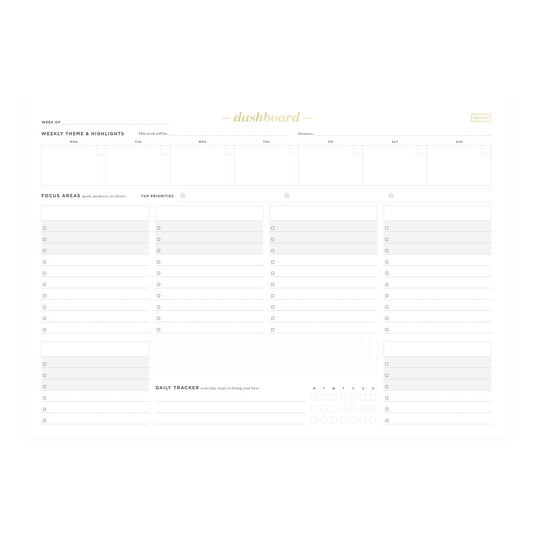
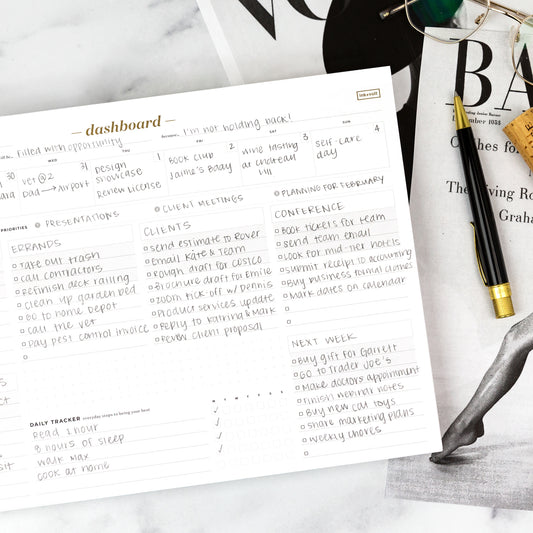
![[Free Worksheet] Project Planning Essentials](http://inkandvolt.com/cdn/shop/articles/2018_Song_ProjectPlanning.jpg?v=1563561100&width=1760)
Big project? Yep. Pressure? Check. Stress? Yes. A plan of action?! Hmm…kinda, sorta…
That big scary project you hoped would stay hidden in the closet or under your bed with the dust bunnies can be pretty tough to face. But in the bright light of day, it isn’t really so bad.
Basically, any big project just a compilation of many small steps that build on each other, developing and morphing until the project is complete.
But in the beginning (before you’ve figured out what you’re going to do), it’s very common to feel overwhelmed, anxious, and frozen with indecision because a lot of little steps can be just as intimidating as one big one.
A little bit of stress or pressure isn’t automatically a bad thing – actually, a small amount of stress is motivating. It’s only paralyzing when you get it in large or lengthy doses. Where do you even start? What if you start, but go the wrong way and waste time?
These concerns and feelings are fueled by things like:
- Your deadline(s)
- Expectations (yours plus those around and above you)
- Available and necessary resources
- Breadth or scope of the project
- The unknown
- Inadequate or unclear answers to critical questions
However, what’s most important – more important than any of those other factors – is how you respond to your feelings and those things that aggravate them.
It’s like opposite day – you feel anxious or stressed, but you just have to tell yourself it’ll be ok, things will come together, and you’ll develop a plan of action that will deliver a successful project. Then go do it. Don’t worry, we’ll show you how.
Download our free project planning worksheet now — and use the tips below to make your next project amazing.
Going from big to small
No matter what kind of project you’re committing your time and energy to, you usually start out with some idea of where you want to end up. You may not know how you’ll get there, but you have a picture of what you’d like to end up with.
With this information in mind, let’s first focus on the big items and then go deeper into each one to identify the various small steps you’ll take to finish your project.
Summarize your project
In anticipation of brainstorming your actual project plan, write out a brief summary of the project at a high, executive summary level based on what you know right now. In other words, what are the basic need-to-know’s?
In this summary, include information that pertains to the 5 W’s: who, what, where, when, why.
- Who is involved in the project or who is the project important to, e.g. key stakeholders
- What is the project and what is your role in it
- Where will the project’s impact be most focused, e.g. a particular department, where is the project physically taking place, or where will you be working on the project
- When is the project due, when does it need to be completed
- Why is the project important to you, the end user, a client, your community, etc.
Then, find someone else to explain your project to, even if they’re not familiar with it, or just talk about the project out loud to yourself.
By talking out loud and getting another person’s feedback and perspectives, the dialogue will generate ideas or concepts that you wouldn’t have considered otherwise, especially if you’re going solo on this project. Never underestimate the power of simply thinking out loud.
Don’t fear the unknown
Now, make a list of what you don’t know or challenges related to this project. Consider questions you have, concerns about practicality of the project, and unknown terms or procedures; and if you couldn’t answer any of the 5 W’s in your summary above, include those items here in this list.
For each of these unknowns, identify where you’ll go to get the information you need, whether it’s from a person, doing an online search, or tapping into resources at work like software or databases.
Keeping and tracking this information from the beginning to the end of the project will help you identify what you didn’t know, what answers you found, and what other unknowns pop up along the way.
The unknown is scary and intimidating, but by writing each unknown down and making a plan for how you will learn about it or get it done, you are putting yourself on the right track.
Identify activities and tasks
You’ve got your project summary in hand and have a grasp on what you don’t know. Now you’re ready to dive into more specific details on how you will accomplish your project.
1. First, take a stab at writing a list or making a sketch of the major phases you foresee for the project: significant milestones or developments, and activities that you know at this time will be important to get to the end product.
This brainstorming period is like a brain dump or writing out a to do list without considering order or time. Just write down project activities and tasks in a free flowing way, without considering any other details.
2. Next, categorize or group tasks together. Organize them in a more orderly fashion, based on what work can be done together and when certain deliverables will be due.
Also, identify which, if any, activities are dependent on one or more other activities. For example, you can’t choose materials until you’ve researched possible vendors to source materials from. Put your steps into chronological order so that they domino into logical steps.
3. Lastly, look at each mid to high level task or activity and use the SMART goals process to make sure each meets the right criteria to be a valuable step:
- Specific: Your project tasks have been drilled down into specific steps and details and you’ve combined any that overlap or duplicate.
- Measurable: Your strategy for tackling each specific task is not vague, like “brainstorm title ideas,” but is instead is measurable, like “brainstorm 5 title ideas.”
- Attainable: You can accomplish the task within the time you need to complete the project (discussed more below).
- Relevant: Each task is necessary to your project and isn’t unrelated.
- Time-bound: You have a firm project deadline and deadline for your tasks (discussed more below).
Mapping out your timeline
You’re timeline is one of the most important and challenging components of your project plan to create. The most important thing to remember throughout the entire process, though, is that you and it should be flexible. Being adaptable to the ways that your project changes as you work on it will make the process easier.
Start with a big picture question first: when does your project need to be finished? What is the exact day? Every project has a measurable start and end point, it is time bound. *Note if you don’t know the end date, and the project was assigned to you by your manager, make sure you ask!
Then, calculate the number of days, weeks, or months that are between today/your start date and your end date. This will help you build your milestones.
How much time do you need, based on how much time you have?
Now that you know how much time you have, it’s time to reconcile that with developing a plan that allows you to succeed given time constraints and deadlines.
Because most people underestimate how much time they need to do something and overestimate how much they can do in a limited amount of time, don’t go overboard in your calculations. Assume you will go much slower than you think you will.
You’ll also need to consider:
- Review time or delays from third parties
- Resources that aren’t currently available that you must wait for
- Your current and future workload
- Other projects that you are working on
- Your upcoming personal schedule and commitments
Look at your “unknowns” and mid-high level tasks that you identified for the project above; now determine how much time you need for each step. One way to do this is to go task by task and just write next to each how much time you need. Even if it’s just a rough estimate, a range, or approximation, that’s okay for starting out.
If that way of calculating time is too overwhelming or you’re not sure where to begin, try working backwards. With your end date in mind, work backwards from your end date to the present, writing out or blocking out on a calendar how much time you need.
A smaller scale example demonstrates this process: let’s say you’re trying to decide when to leave for a meeting that begins at 2:00 pm across town.
Consider that: (1) you want to arrive at 1:45 pm, (2) you anticipate needing an hour to commute from your location to the meeting location, (3) you could be delayed up to 15 minutes by traffic and/or looking for parking, and (4) you need 15 minutes to pack up your materials and walk to your car. Based on each of these activities, you need to leave your location at 12:15 pm. This mini version of working backwards works for your project tasks too.
Finalizing your timeline
The final step in your project planning will be to organize all this great information you’ve brainstormed and developed, and document your plan so your commitments and goals are clearly laid out and easy to follow.
You might use a Gantt chart or a project planning template in Excel or other software program — or you can use our project planning worksheet. The format doesn’t really matter as long as it supports you and you’re comfortable with it.
A final check is to compare your project timeline and deadlines against whatever other calendar or planner you use for work or daily life. Make sure there are no conflicts hiding!
Even problems can be opportunities
We hope these ideas motivate you and guide you through a successful project planning process. Don’t forget to be flexible in the face of unexpected problems, delays, or frustrations. Even wrong turns are opportunities to learn and adapt!